Painting & Drawing blog
OIL PAINTING GUIDE FOR BEGINNERS
Tips, materials and techniques
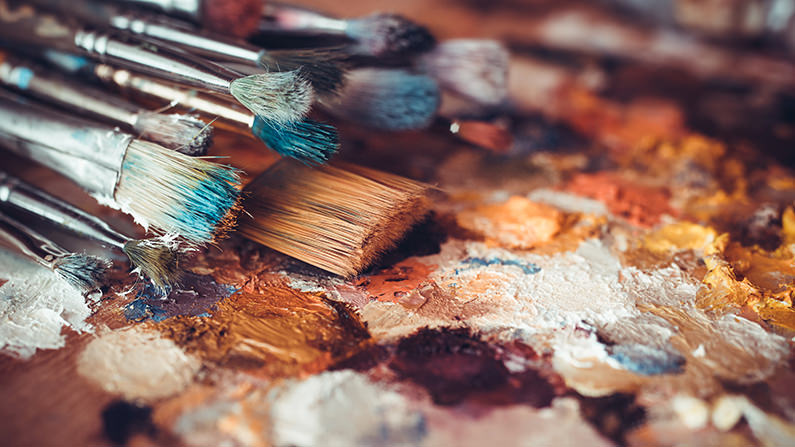
I love oil paint. The buttery feel of oils is unique and despite the slight inconvenience of having to dilute them and clean up after them without using water, I’m still not inclined to switch to acrylics. Oils remain manipulable on the canvas for days allowing you to alter and work into them in a way that’s impossible with other mediums, which may actually make them easier for beginners.
When you paint with oils there are one or two rules to follow to ensure that your paintings survive the test of time, and many beginners are put off trying oil paints because they think that the technique is too complex to master. Looking for advice on painting forums – where you’ll find very lengthy discussions and varying opinions about paints, mediums and priming solutions and how to apply them – can be rather intimidating. In this post I’m going to try to lay down some really basic step-by-step guidelines for the complete beginner, as simply as I can. I hope this will give you confidence to buy a set of oils and get painting! We’ll cover which materials to use, what to look out for when making purchases of oil paints and painting equipment, and some basic techniques for either layering or painting all in one go (you can jump straight to techniques here). There are absolutely no paid links in this post, just some independent suggestions for useful products.
CHOOSING AND PREPARING YOUR CANVAS
I’m going to assume here that if you are a beginner you don’t want to either stretch your own canvas, or apply the sizing and priming to it yourself. If you get really serious about oil painting in future there may be reasons for doing either of these, but when you’re starting out it’s much easier to buy a pre-stretched and pre-primed canvas that has been fully prepared for you. Commercially prepared canvases go back as far as the Impressionists who often worked on them, so you are in good company!
Types of canvas
You’ll need to choose between working on a traditional stretched canvas, a ‘canvas board’ or a ‘canvas panel’. Boards and panels are designed to be more cheap, lightweight and transportable and are generally intended either for practice paintings, or for painting out of doors.
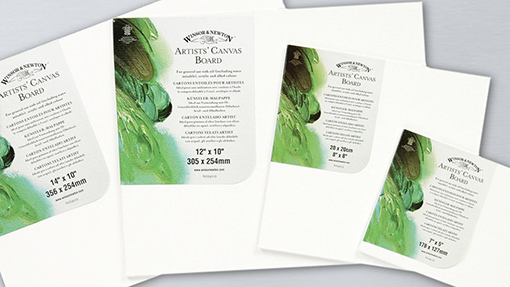
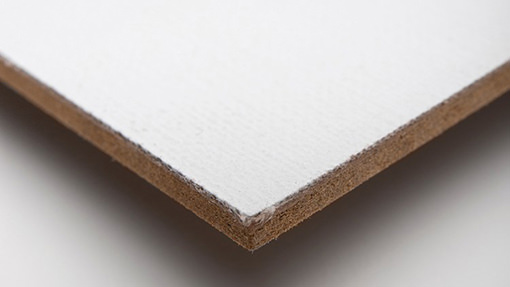
Canvas boards (above) are available in multipacks and are great for sketching and experimenting on, but because they are usually fairly flimsy and made from non-archival materials, they are best avoided if you want the work to produce to last in good condition for years. Panels (below) are made with harder boards of some description and may be made with archival glue to protect the canvas from the acid in the panel – check the label to see if it is acid-free.
If you buy a regular stretched canvas you’ll need to choose between a ‘cotton duck’ canvas (from the Dutch work ‘doek’, meaning cloth) and a linen canvas. Linen canvases have a tighter weave and are particularly elastic and strong, making them popular with many professionals. This doesn’t mean that they are superior to cotton or that there’s anything wrong with a cotton canvas, and indeed you might prefer the coarser texture of cotton.
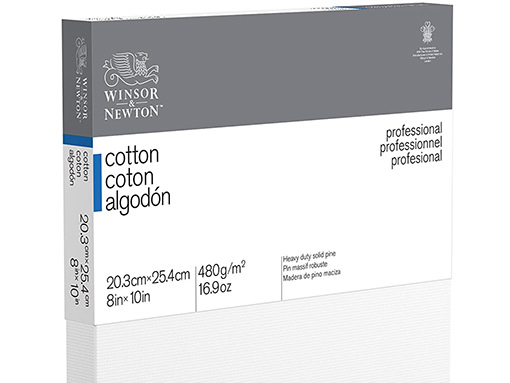
If your canvas feels a bit slack and not ‘springy’ enough, use the little ‘canvas keys’ that come in a small back stapled to the back of your canvas to tighten it up. Jacksons have a good tutorial on how to do this.
Sizing and priming
Pre-stretched canvases should always come fully sized. Sizing is the practice of coating the canvas with either a rabbit skin glue, an acrylic polymer size or a PVA solution in order to seal the fibres of the canvas, protecting them from acids in the oil content of the paint preventing them from rotting as the paint slowly dries.
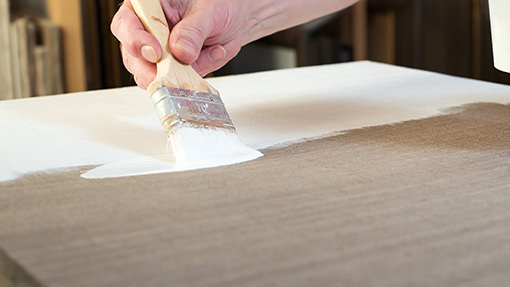
Most commercially stretched canvases will also be pre-primed, giving you a bright white finish that’s ready to work onto. Priming provides additional protection for the fibres and also provides a smoother surface, tightens the canvas, and encourages good adhesion of the paint layers. You don’t absolutely have to work onto a primed canvas as long as it is sufficiently sized, and some people like to work in a sketchy manner onto a plain canvas background which they allow to remain visible. If you want to work onto an unprimed canvas there are some stretched linen canvases available which are pre-sized with glue but not primed. These are typically referred to as ‘glue sized’ canvases.
Priming is a slightly confusing area. Most prepared canvases will state that they are ‘Triple primed with three layers of gesso’ which actually means that they have been primed with a universal acrylic-based primer suitable for painting with either oil or acrylic paint. This type of priming often known as ‘Acrylic Gesso’ but has nothing to do with real gesso, which is a traditional mixture of glue size and gypsum. Sometimes it is just described as ‘Universal’ primer. Some serious oil painters think it’s better to work on a canvas that has been prepared with an oil based primer rather than an acrylic one and prefer to buy ‘oil primed’ linen canvases which are available at a price. However many painters are perfectly happy with a universally-primed canvas although some will give their canvas an extra coat of primer if they feel the priming layer is too thin and the canvas lacking in tautness and too absorbant.
THINNING YOUR PAINT
Let’s now talk about how you actually apply your oil paint. You can of course apply your paint straight out of the tube, but it will be stiff and dry. If you want to paint very thickly in an ‘impasto’ style there are various mediums you can mix with your paint and we’ll cover impasto painting in more depth further down. If you don’t plan on painting with very thick paint them you will want to dilute your paint a little to create the right flow. Some form of spirits (solvents) are traditionally added to thin down oil paint, and various types of oils may also be added to extend it and to help it to flow. You’ll need to learn a little bit about how to balance the two.
Thinning with spirits
Traditional oil paint is totally insoluble in water, which cannot be used to dilute it. The oil paint that comes in your tube is a mixture of a pigment and an oil binder such as linseed oil or safflower oil. If you want to thin your paint to make it flow more easily you could simply choose to add more of one of these types of oil, but your paint would quickly become very oily and glossy which is not necessarily a look (or texture) that you want. Moreover because of the way oil paint slowly dries it’s important not to use too much oil in any under layers because you may cause your painting to crack. This is something that we’ll talk about in more depth in a minute.
In the one or two layers of paint applied directly over the priming layer, the best way to thin your paint is with a solvent such as ‘Artist’s white spirit’ which is sometimes also described as ‘mineral spirits’. Don’t be tempted to use regular white spirit that you can buy from a DIY store because this will contain impurities that may damage your paint layers.
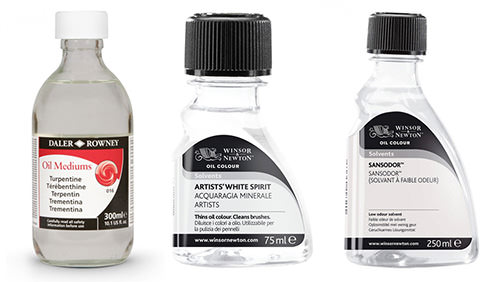
For centuries the traditional spirit for diluting oil paint was turpentine and you can still buy this but it’s pretty toxic and most people prefer to avoid it. If even artists’ white spirit gives you headaches or you are particularly concerned about toxicity then there are low odor products such as Winsor & Newton’s ‘Sansador’ or Gamblin’s ‘Gamsol’ which are still petrolium-based but have had aromatic compounds removed and evaporate much more slowly. There are also some new solvents distilled from citrus fruits which claim to be non-toxic.
Many people will use spirits to clean their hands, brushes and palettes too, although there are gentler ways to do this with the use of products that include vegetable oil-based soap, such as ‘The Master’s Soap’ or ‘The Master’s Brush Cleaner’ made by General Pencil or Jacksons’ ‘Marseille Soap Pellets’. Da Vinci and Escoda also produce artists’ oil soaps. Weber’s ‘Turpenoid’ brush cleaning products made from an odorless turpentine substitute which is supposed to be non-toxic and very effective.
Thinning with oils
People may choose to dilute their oil paint with the addition of extra oil in order to create thin glazing layers, to increase the glossiness of their paint, or to either speed up its drying time or slow it down in order to manipulate the paint for longer.
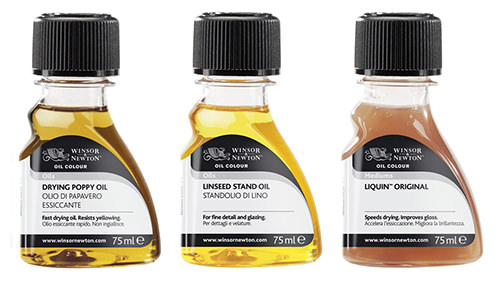
Linseed oil is the classic choice for oil painting but can be a little yellowing and so safflower, walnut or poppy oils are a better bet for whites or pale colours. Linseed generally slows down the speed at which your paint will dry, but modified ‘Fast Drying’ linseed or poppy oil will speed it up. ‘Stand oil’ is a thickened linseed that is good for making even, smooth glazes. A popular product by Winsor & Newton called ‘Liquin’ is an alkyd-based solution designed to dilute oil paint and increase its drying speed and viscosity. Liquin isn’t an oil (alkyds are oil-modified resins, fast drying and semi-matt) and also contains a small amount of solvent but it is designed to perform more like an oil medium than a solvent thinner. It’s more suitable for use on upper layers of a painting rather than underlayers where it should be used sparingly.
The balance between solvents and oils
If you add a great deal of solvent to oil paint in order to thin it, you may accidentally dilute the oil content of the paint to the point where it becomes flimsy and doesn’t adhere well to the canvas when dried to a film: this is called becoming ‘underbound’. When this occurs there’s a risk that your paint layer may become unstable as it dries, leaving it vulnerable to cracking and flaking. Therefore when you dilute a paint with spirits you need to add nearly a similar amount of oil at the same time. This isn’t necessary in the first layer of paint because the first layer will sink into the priming layer where there is plenty of oil. Therefore your first layer of paint can be diluted just with a spirits. For subsequent layers you need to balance any added solvents with increasing amounts of oil. This is the famous ‘Fat over lean’ rule that we’ll look at presently.
If you are thinning your paint with Liquin then there isn’t any need to add extra oil to balance the solvent content, although Winsor & Newton recommend applying layers containing a great deal of Liquin quite thinly and as we’ve already mentioned they suggest using it sparingly in lower layers. It’s available in different formats including a ‘fine detail’ version. W&N also make an ‘Artists’ Painting Medium’ which is a mixture of both oil and a solvent, and slows drying time rather than speeding it up. Schminke’s ‘Medium W’ gel is another alkyd based alternative which does not speed drying time. You can wash it with soap and water.
The ‘Fat over lean’ rule
The meaning of ‘fat’ in this context refers to the amount of oil contained within the paint layer. An oil-heavy mixture is ‘fat’ whilst a layer containing little or no extra oil is ‘thin’. To fully understand the Fat over lean rule it’s useful to have a grasp of why it’s important.
When you apply your paint mixture to your canvas, the first thing that happens is that any solvent you have added evaporates. This happens fairly quickly. Meanwhile the oil binder added to the pigment to create the paint plus any extra oil you’ve added yourself begins to oxidize, and as it does so it starts to dry and harden. Whilst the paint may feel touch dry on the surface within days or weeks, the process of the oxidization of the oil content takes literally decades to fully complete (a process known as ‘curing’).
As oil slowly oxidizes it contracts, and therefore the paint layers will continue to ‘move’ for a very long time before they are fully cured, during which period they will be unstable. If a layer of paint dries at a faster pace than a layer above it, it’s likely to cause the paint on that upper layer to crack. Therefore the goal of the Fat over lean rule is to ensure that each layer dries a little more slowly than the one(s) above it. The more oil a layer has the longer it will continue to crack as it dries and the more flexible it will remain in the long term.
Your aim, then, is to create slow drying layers over fast drying ones, or more flexible layers over less flexible ones. Layers will anyway absorb oil from the ones above them, and so put all together in practical terms the Fat over lean rule means that no layer of paint should have more oil added to it than the one above. Remember, solvents make paint thin, and oil makes it fat.
Having a large and stable oil content in an upper layer is a good thing because the upper layer will be the most vulnerable to damage even when fully cured and so flexibility and good adhesion in the upper layers from plenty of oil is a positive thing. Ideally you will add no oil at all to the very first layer and then add gradually increasing amounts in each subsequent layer. If you are using a very oil-heavy layer to create a reflective glaze (glazes are traditionally used in the depiction of water, silky fabric, glass, jewellery and so on) this should be the very last layer. Be aware that a glaze should be thin, otherwise an extremely oily layer will wrinkle.
Another important factor that affects how fast your layers will dry is how thickly you apply them, and so you should also think in terms of ‘thick over thin’, keeping your lower layers thinner and reserving the use of thick paint for upper layers. Don’t apply a thin layer of paint over a thick, impasto layer because it will most certainly flake off in time.
If you are working with a product like Liquin which already contains both an alkyd substance and a bit of solvent then you don’t need to add extra oil as you apply subsequent layers but it’s advisable to use just a little or no Liquin in your first layer and add a little more to each layer on top.
Can you paint just with oils and without solvents?
Yes in theory you can and many people do, although you won’t be able to create thin washes for any underlayers in the same way you could by mixing with spirits and a drop of oil. The fact that you would use more oil in an underlayer doesn’t matter as long as you apply EVEN MORE oil in the layers above: this would still obey fat over lean. It would help to leave your lower layers longer before painting on top to give them a head-start on drying.
APPLYING YOUR PAINT: WORKING IN LAYERS
However you want to paint in oils you need to follow the Fat over lean rule if you are going to employ more than a single layer, but beyond that there really are no further rules for applying your paint. There are however a number of different traditions for laying on your paint which may be helpful to learn a little about. We’ll next look at the differences between painting wet-on-wet (‘direct painting’) and painting in layers (‘indirect painting’), and different options to apply a coloured background and work with some specific underpainting techniques.
WET-ON-WET or ‘ALLA PRIMA‘ (direct painting)
Faced with your white ready-primed canvas, you may be perfectly happy just to pitch in and start applying paint, and to apply all of your paint before any of it has dried. This technique is widely known as ‘wet-on-wet’, or ‘alla prima’ which can be translated from Italian as ‘first attempt’ or ‘at once’. In French it was known as ‘au premier coup’. There is some confusion about the true meaning of ‘alla prima’ and whether it on strictly describes a painting completed in one session or not (this seems illogical because oil paint remains wet and workable for days) and also whether alla prima entails working in a single layer or not. Some will argue that it can still encompass a painting made with a degree of layering as long as paint was applied over other paint that wasn’t yet dry.
Regardless, if you want to work in this very quick and direct way without any background colour and perhaps no ‘sketching out’ then you have the option to either apply your paints wet-on-wet in one of two ways – either wet into wet, or wet onto wet. You’ll get a very liquid, fluid effect that can sometimes be a little flat with no underpainting colour humming through other layers. Here’s a beautifully accomplished painting by John Singer Sargeant which utilizes wet on wet painting with no underpainting, even though one should note that it was painted over a number of sittings.
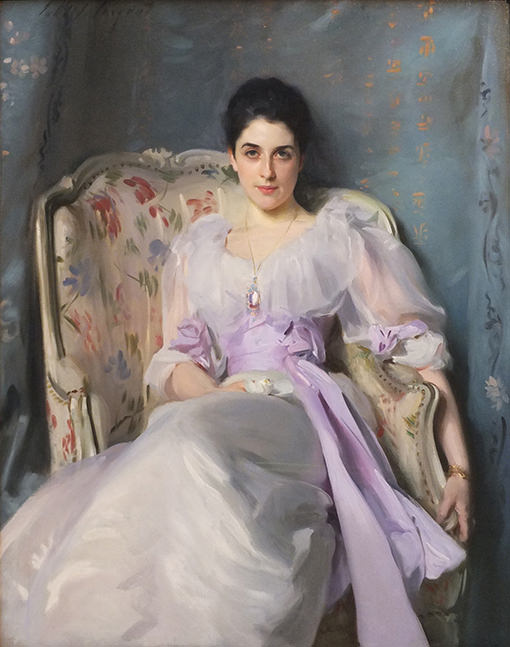
Lady Agnew of Lochnaw by John Singer Sargent, 1892,
Photo credit: National Galleries Scotland collection. Creative Commons – CC by NC
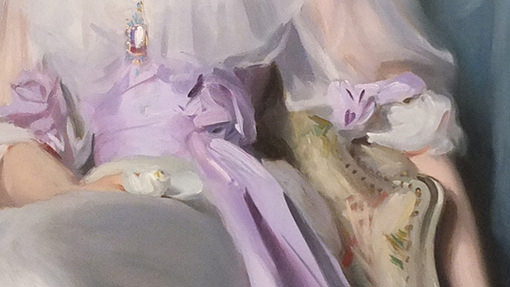
With direct painting if don’t actively want your colours to blend as you apply them to your canvas you’ll want to avoid making them too runny and oily. If working in a single layer you could thin your paint to your satisfaction with Liquin, Medium W or W&N’s Artist’s Painting Medium, or just with a little spirits. If you want to thin your paint a great deal then you need to balance any spirits added with some oil to avoid your paint becoming unbound, and if you want to paint wet over wet in any substantially layered way then you’ll need to follow the Fat overlean rule. People painting alla prima often like to paint quite thickly and opaquely and if this is the case, look at some of the ‘Impasto’ mediums we will discuss below in order to extend your paint and get a good flow.
One last point to make is that there’s no reason you can’t apply some coloured underlayers, and then a single layer of wet-on-wet paint above. Many layered paintings will have some wet-on-wet work especially in their final layer of paint. Most Impressionist paintings give the impression of having been executed alla prima with wet paint but in fact most have either underlayers or blocky underpainting beneath. If you have the opportunity to look at paintings by Claude Monet close up you’ll notice that he uses loosely scumbled paint over more controlled and dried paint layers beneath.

Detail from Haystacks, end of Summer by Claude Monet, 1891
Photo credit: Musée d’Orsay, dist.RMN / Patrice Schmidt
LAYERED PAINTINGS (indirect painting)
Working in layers of paint where you wait for one layer to be touch dry before applying more paint on top of it is known as ‘indirect’ painting and is the most traditional method for applying paint. Artists would begin with a coloured underlayer before usually employing some sort of underpainting technique involving blocking out areas of broad paint, and lastly refining their painting and their finer details on top. Often some of their layers would involve a degree of transparency with semi-opaque, transparent, or scumbled paint revealing dried paint beneath.
Coloured backgrounds/ toning layers
There are a number of reasons why you might want to add a tinted background layer to your painting. Faced with a dazzlingly white canvas and particularly if you are doing any kind of figurative painting from observation, it can be really hard to judge tonal relationships and colours. Therefore many people like to start off with a layer of colour whose tone equates to the mid-tone values of whatever they are painting.
There are other potential benefits to adding a coloured background. If applied over the entire painting, an underlying ‘toning’ colour can impart a warmth and tonal unity to the layers above it by reflecting or revealing it through subsequent layers of semi-opaque paint or scumbled paint. Traditionally artists often covered their priming layer with a layer of thinned down paint called an ‘Imprimatura’. This would stain the pale coloured priming ground in order to create a mid-toned background which would unify the colours applied above it, creating an overall tonal atmosphere and a depth and vibrancy. Imprimaturas were often applied in an ‘earth’ colour to impart a warm tone but you could also apply a background layer in a neutral grey or a cooler shade with some blue in it. This work by Whistler shows the use of a warm brown Imprimatura, revealed in the unfinished lower half of the canvas.
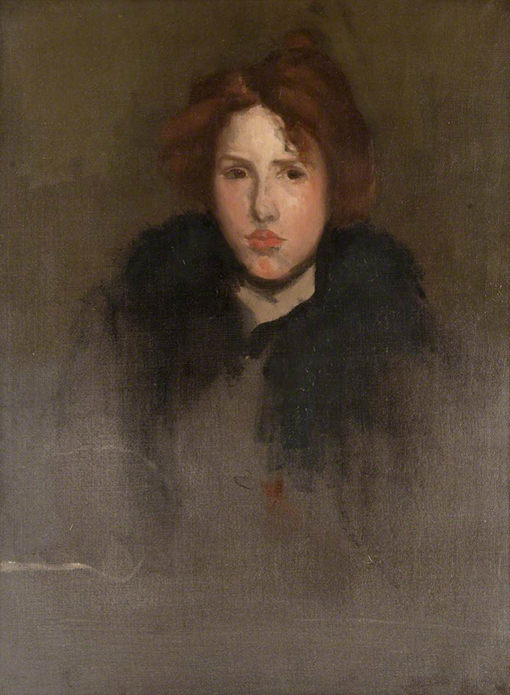
Unknown French Girl by James Abbott McNeill Whistler, 1895-6
Photo credit: Hunterian Art Gallery, Museum of Glasgow
Another option is to block in large areas of different flat colours to define the different elements within your painting, rather than one single colour across the whole canvaas. This was a method often employed by the Impressionists and was close to the ‘Ébauche’ method of underpainting that we’ll discuss in a minute.
The first paint you apply on top of the white priming layer will dry more slowly than subsequent layers, which will sink into those beneath them. Therefore you should apply your paint quite thinly and work it well into the canvas with your brush or you’ll be waiting well over a week for it to be touch dry. There’s no need to add extra oil to this paint layer because it will be absorbed by the priming below which has plenty of oil in it, and because following the Fat over lean rule you’ll want to avoid excess oil in your first layer of paint.
Underpainting
If you are doing a fairly traditional figurative painting then how do you sketch your design onto your canvas? In theory you could use pencil or charcoal to do this, but if you’ve established a coloured underlayer you may struggle to see this and you also run the risk that any graphite or charcoal will mix with the paint that you apply on top and turn it grey. It may be that you are happy just to launch in and start painting without any kind of sketch. However many people prefer to do some kind of underpainting, whether a simple sketch in thinned paint to help them ‘map in’ different areas of their design, or a more substantial blocked-out underpainting that helps them define light and dark tones and maybe adds some depth to their final paint layers above.
There are many different techniques of ‘underpainting’ that arose from different painting traditions. It’s useful to be familiar with one or two of the most famous methods because you’ll often come across references to them in relation to oil painting, although there’s no need to follow them if you don’t want to.
- ‘Grisaille’ underpainting refers to a thinned down paint in an earth colour or a grey tone applied to block in areas of light and dark. Historically ‘grisaille’ referred to a grey coloured underpainting and ‘brunaille’ to a brownish one, but today the term is used interchangeably for any monochromatic underpainting. If a grey containing a white pigment was used this was often referred to as a ‘dead colour’ layer. A grisaille layer may be very loose and sketchy, or may look like an entire desaturated painting rather like a black and white photograph. This conveniently unfinished portrait by Gainsborough shows a good example of the use of a warm Imprimatura layer with some sketchy grisaille-style, underpainting on top in very thinned paint.
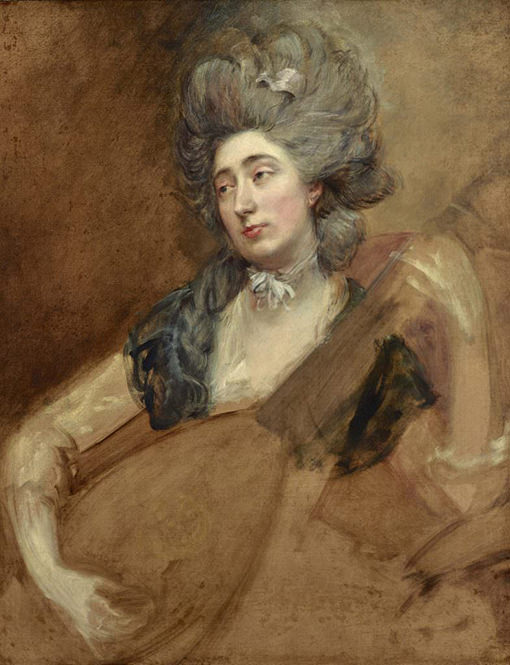
Margaret Gainsborough holding a Theorbo by Thomas Gainsborough, about 1777
Photo credit: National Portrait Gallery, London
-
‘Ébauche’ underpainting, from a French word meaning ‘first pass’ is a type of coloured underpainting where areas of slightly desaturated, slightly dull washes of thin colours are used to establish large areas of different forms in something close to their actual colour. It is sometimes known as a ‘lay in’ of paint. Part of a famously unfinished painting by Benjamin West, this work shows the use of ébauche-like underpainting.
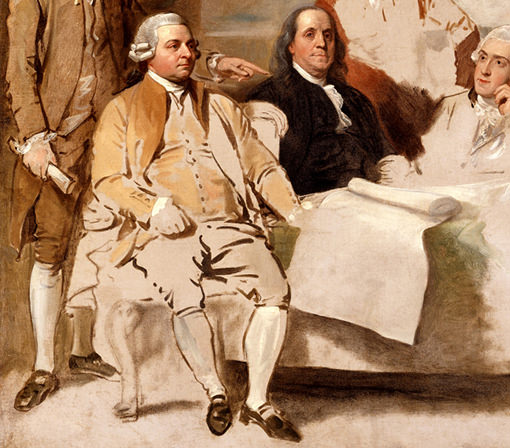
Detail from The Treaty of Paris by Benjamin West, 1783
Photo credit: Winterthur Museum, photograph, Herb Crossan
A more modern way of working is to simply paint in fully saturated, fairly opaque blocks of colour for your lower layers. You can then either fully cover these blocks, or allow some of them to form your dark, light or mid tones. I paint my underlayers differently depending on what I’m painting: for skin tones I tend to begin with a paler underlayer and build up my colours whereas for clothing I’ll choose an exact mid-tone and then add shadows and highlights on top. Whatever method works for you is absolutely fine.


Impasto painting
Impasto is simply a term used to describe working with very thick, stiff paint. It’s a technique that you can use in both wet-on-wet or layered painting, providing you reserve it for your top layer. Impasto painting can be done with a palette knife rather than a brush. It’s commonly thought that Rembrandt was one of the first artists to apply his lovely textural paint with a knife, and Van Gogh is more modern example.
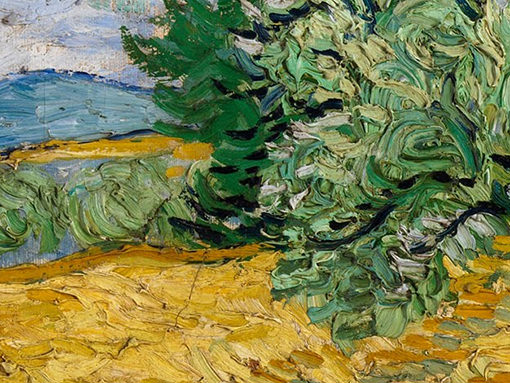
Detail from Wheat Field With Cypresses by Vincent van Gogh, 1889
Photo credit © Metropolitan Museum of Art. The Annenberg Foundation Gift, 1993
In theory you could create Impasto simply by using paint neat out of the tube. There are several problems with using your paint in this way, however. Not only will it be very expensive and your paint will take forever to dry, but because the outer skin of a thick mass of paint will dry more quickly than the paint on the inside you may end up with a wrinkled surface. There are various mediums you can add to paint to better achieve a satisfactory Impasto effect. Beeswax pastes are popular, and Winsor & Newton make two types of quick-drying Liquin medium for painting thickly: ‘Oleopasto’ which dries to a semi-matt finish and their Liquin ‘Impasto’ gel which has a glossier finish. W&N suggest using a ratio of one part Oleopasto or Liquin Impasto to two parts oil paint.
HOW TO APPLY YOUR OIL PAINT
Oil paint can be applied in a number of ways and not just with brushes! Let’s look at the different options
Oil painting brushes
The traditional brush for oil paints is made from hog hair which is stiff and springy and flagged (split) at the end of each bristle. This makes it tough enough to manipulate oil paint and good at carrying a ‘reservoir’ of paint and spreading it smoothly. Hog hair brushes are easy to identify from their very pale or white bleached colour and will often be made with extra long handles so that you can keep a certain distance from your easel as you paint.
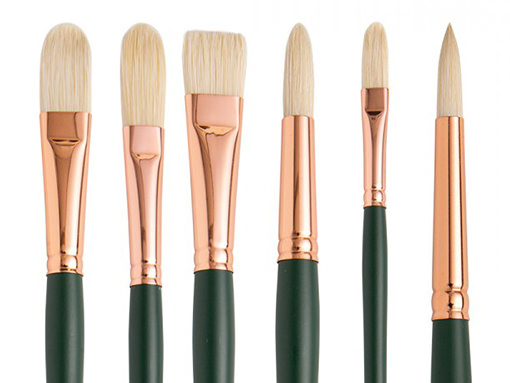
Hog bristle is difficult to replicate with a synthetic brush but there are some good quality synthetic ranges around made with polyester filaments which mimic the stiffness, shape and the microscopic texture of hog hairs, although I have yet to come across any that are quite as strong and springy as natural hog. Some artists like to use a softer brush for finer details or glazing, and for this I’d recommend a black hog bristle brush which is softer than regular hog, or synthetic brush aimed at acrylic painters. Synthetic Mongoose brushes are also good for finer details in oils.
Palette knives
A palette knife or two are a must for oil painting. They come in a variety of sizes and shapes: some are fairly rectangular with curved corners and others are quite pointed. Palette knives are incredibly versatile. They are made from a soft and bendy metal so not only can you scrape off any mistakes from your canvas with them but you can also apply your paint with them if you are working in a thick impasto style (Rembrandt likely applied much of his paint with a palette knife). They are also a very useful studio tool for scraping paint around on your palette and scraping it off when you’ve finished with it. Mixing your colours with a palette knife is very efficient and saves your brushes from wearing out quickly.
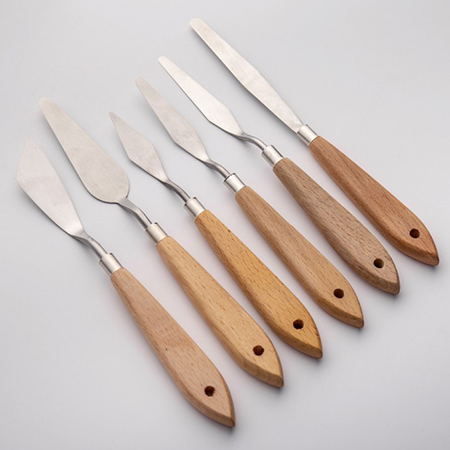
Photo credit: jacksonsart.com
Silicone painting tools
Silicone ‘painting tools’ or ‘colour shapers’ come in different sizes and shapes. Many have little ridges to allow you to scrape into thick paint and create interesting textures.
Photo credit: jacksonsart.com
MIXING YOUR PAINT
Everyone is familiar with a traditional wooden artist’s palette and nice oiled walnut palettes are fairly inexpensive to buy. When you buy a new wooden palette you’ll need to ‘condition’ it by rubbing some linseed oil into it with a rag a few times in order to seal the wood and make it less absorbent. To save yourself a lot of cleaning you can also buy disposable oiled paper palettes. These work well and are especially handy for painting out of doors when it would be difficult to clean off a wooden palette to transport it back home. Some people like to use palettes made from glass or from clear acrylic which are very easy to clean and allow you to judge the shade you are mixing effectively if you hold the palette over your canvas to see the colour you’ve already applied beneath.
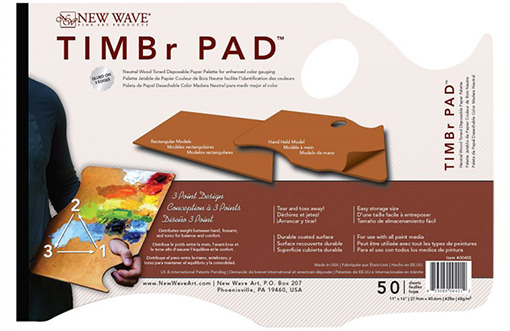
Disposable palette. Photo credit: jacksonsart.com
One tip I find very useful is to arrange my colours on my palette according to their colour groups (reds together, then oranges, yellows, greens and so on) rather than putting them out randomly. It saves so much time looking around the palette when I want to locate a particular colour. Even if you plan on using a very small number of colours, arranging them in the same order on the palette every time will make it easier to find the right colour quickly. I save some space in the middle of the palette for making mixtures, and put my whites in the middle because I use them often to tint the other colours.
Be careful not to waste paint by putting out a larger blob than you need. This is so easy to do and you really have to train yourself to be restrained! You can keep paint workable on a palette for longer by covering it between painting sessions: I do this by placing Clingfilm (plastic wrap) over the palette and pressing it around each blob or puddle of paint to remove any air bubbles.
THE VARNISH QUESTION
There’s no necessity to varnish your painting and many won’t bother. However if you’re concerned to protect your painting against environmental damage over the long term then varnishing it will certainly protect it from dirt and dust. It will also saturate and enhance your colours and will give a consistent sheen across the painting, unifying areas of paint that may be more or less glossy depending on how much oil was mixed with them. You can choose between a matte, satin or glossy finish.
Because oil paint dries so slowly it is usually advised that varnish should not be applied within 3-12 months of completing the painting (opinions as to the ideal waiting time) during which time the paint will continue to contract as it oxidizes. Some people advocate a ‘hard-dry’ test where you press the end of your forefinger onto the paint, polish the area you touched with a soft cloth and see if any finger mark still remains. If it does, then the painting isn’t yet dry enough to be varnished. Gamblin make a varnish called ‘Gamvar’ which was developed in collaboration with the National Gallery of Art in the US and which the company claims can be safely applied as soon as the paint feels firm to the touch when pressed, whether or not it leaves a finger mark.
HOW TO SELECT YOUR COLOURS
This is one area we haven’t covered yet because there’s such a lot to discuss when it comes to choosing the quality of paint and the individual paints you’ll want to make up your colour palette. In this post on how to choose your oil paint colours I’ll look at the question of paint quality amongst the different ranges on offer as well as issues of lightfastness, transparency and tinting power. We’ll look at which colours are best avoided due to issues with fading or with chemical instability.
© Article rights reserved. View this oil portrait artist’s work here
CATEGORIES
DRAWING PEOPLE
DRAWING ANIMALS
DRAWING MATERIALS
OIL PAINTING
WATERCOLOUR
PAINTING MATERIALS
FRAMING

